February 27, 2012

Repurposed Thrift Store Lamp

Follow Me on Pinterest


Several weeks ago I went "thrifting" with a few girlfriends.  We spent the whole morning shopping around the local thrift stores - Salvation Army, DAV, etc.  It was so much fun and each of us spent around $10 and came home with bags and bags of goodies!  


One of my treasures was this lamp I walked away with for $2.50!  It's in great shape and it works!  Sorry for the crummy picture - it was rainy outside and I didn't realized how bad the lighting was when I took these pictures!


I picked up this lampshade at a thrift store for $2 and the vintage floral sheet for $1.  
**Here's a great tip I learned from a friend of mine who makes quilts, pot holders, etc. - you can find some really great vintage fabrics at thrift shops!  Look for sheets and curtains that are in good shape.  A lot of the vintage sheets are actually good quality and the patterns are unique and can be really beautiful.  Here's a link to my friend's blog and her Etsy shop.

Ok, now for the tutorial!  First you'll want to paint your lampshade if it's not already white.  My fabric is mostly white, so I didn't want the shell pattern on the shade to show through!  If you find a white lampshade, you can skip this step.


To measure out the fabric, just lay your lampshade on its side and using a pen or fabric marker, draw a line next to each side of the shade (top and bottom) as you roll the shade in one complete circle.

It's hard to see in this picture, but you can (sorta) see the two lines on the back of the fabric

You'll actually want to cut about an inch or so outside of the lines you just made and just a bit longer than what will fit around the shade.

I used hot glue, but you can use a spray glue or fabric glue.  Glue one end of the fabric to the lampshade then roll the shade up with the rest of the fabric.

TIP - I didn't do this, but I learned my lesson.... if you cut your fabric a little longer than needed, you can fold over the fabric and glue it at the seam.  It just looks a little nicer than what I did, which was just to cut off the excess fabric (leaving a rough edge).  See how I fixed this below.
Once your fabric is glued around the lampshade, you'll need to glue the excess fabric over the edges.  I knew my lamp would be right about eye-height, so I didn't take too much care making this look very neat.  If the lamp will be on a table where people may be able to see down inside the shade, you'll want to trim this over hang so it barely lays over the edge.

The bottom side is easy, just flip it under and glue it.

The top was a little more difficult since it has the place where it attaches to the lamp base.


Just cut a line into the fabric perpendicular to the edge of the shade to  get it to lay flat and go around the metal pieces.


At this point, you could stop.
I decided to add a little ribbon to the top and bottom of the shade for a little more detail.  I also added a strip down the back of the shade where the seam in the fabric is (just because my seam was a little messy).

Unfortunately you can sort of see the shells through the fabric, but only when the sun is shining right through it!  Even with the light on, you can't tell.  Next time I'll look a little harder and find a plain white shade to prevent this!

Here's the final product again:

I love the way it turned out and for about $6 total, I have a unique and chic lamp to go by my crafting desk for a little more light on these cloudy and rainy days (ick).

Good luck with creating your own custom lamp!
Follow Me on Pinterest

February 16, 2012

Etched Drinking Glasses

Follow Me on Pinterest

Aaahhh, a house divided....  My husband was born in Pittsburgh and is a die-hard Steelers fan.  I was born in Indianapolis and am a die-hard Colts fan (despite our rough season this past year... ouch).

After seeing some glass etching ideas on Pinterest (like this one from makeit-loveit.com), I decided to make some drinking glasses to represent our rivalry.


This etching cream came from Michaels - I think it's about $30, but I shopped with a 50% off coupon and got it for about $15.  The jar is pretty large and I've already done quite a few projects and the jar is still practically full.  Definitely worth the money!

 I found two of these drinking glasses at Goodwill for $1 each.

I printed out this Steelers Logo onto adhesive vinyl using my Silhouette Cameo.  I removed the center pieces of the logo, leaving the negative image.  Since I'm cheap resourceful, I use contact paper to transfer the image to the glass (see picture above).

Peel off the backing of the vinyl sheet.


Position the vinyl cut out onto your glass, then remove the contact paper.

Make sure to push down the vinyl onto the glass so there are no air bubbles near the edges of the cut-out, otherwise the etching cream could seep under the vinyl.  

Cover the glass with the etching cream.  A thick layer is best - and try to keep it nice and even, otherwise the result will not be as even.


A thick layer is good, but be careful - as mine was laying on it's side, it started to drip a little!  Luckily I had put a strip of tape next to the edge of the vinyl, so it didn't ruin my glass.  The etching cream starts to work almost immediately, so watch for drips!

After about 15 minutes, it's time to wash off the etching cream.  Once you remove the vinyl from the glass, you can sit back and admire your work!

Here is the final Steelers cup.  I gave it to my husband and he loved it!

I've made several other items using this etching cream, I'll post those another day.  This is a great idea for Christmas or wedding gifts.  It's easy to do and it's pretty inexpensive!

Good luck, be safe with the etching cream (it's really bad if you get it on your skin), and happy creating, friends!
  Follow Me on Pinterest

February 13, 2012

Personalized Subway Art

Follow Me on Pinterest

Subway Art has been all the rage these days and I have to admit that I'm basically obsessed with it.  I wanted to make on that was personal to me and my husband.  Each of the locations on this canvas has a fun story or great meaning to it.

For example, Moe & Johnny's was the bar where we had drinks after work one night and no one else from work showed up - it was that night that we both realized we liked each other and wanted to start dating :)
 Key West is where we fell back into love on a group vacation - and where we traveled back to and got married on 5-21-11.  Each location has a smile-inducing memory, personal to the two of us.

This is really easy to make, especially if you have a Silhouette, Cricut, or a similar cutting machine.  It can be done with an exacto knife or a pair of scissors - just might take a little longer!

I started with a 16"x20" canvas.  I find these for really cheap at Michaels.  They usually have a "value pack" that's on sale (or use a coupon if it's not on sale!) making them a few bucks per canvas.


I mixed together some white and black paint for the base color.  Remember, this will be the color of the letters, not the background.  I almost messed that up when I did it!  I purposely didn't mix the paint all the way together since I wanted it to be a little "streaky."  Save some of this mixed paint to use later - you'll see why.


I designed the layout of the words with Photoshop Elements (a cheaper, scaled-back version of Photoshop).  You could easily use a word processor for this if you don't have Photoshop.


I saved the layout as a PDF and moved it into the Silhouette program.  Doing it this way made sure the words would print out the right size.  Keep in mind the Silhouette only cuts paper 12" wide, so you'll have to move the words around in the program so they all fit if you're using a canvas larger than 12"!  Once you've figured out the spacing, then you can begin cutting!


Once everything's cut, you'll want to cut out each word and remove the excess vinyl from around the letters.


I then placed each of the words on the canvas to make sure everything fit and looked good in it's place.  Feel free to adjust your layout at this time (I did!).


I am cheap practical and I use contact paper as transfer paper.  It's your choice, but I find contact paper does the job just as well and is a fraction of the price!  A word of advice - don't push the contact paper onto the vinyl letters too hard - just enough to stick to the contact paper.  Then I use a popsicle stick to push down the letters onto the canvas.  With this method, the letters stick to the canvas and come off of the contact paper really easily.


Once all the letters are transferred to the canvas, I paint a layer of the reserved light colored paint over the letters.  This step isn't 100% necessary, but I think it helps give the edges a nice crisp layer by filling in any gaps between the vinyl letters and the canvas.


After that layer is dry, paint your background layer.  I like to use spray paint for two reasons:
     ~ There is less likelihood that the paint will bleed under the letters (making nice crisp lines)
     ~ You can leave the spray painted layers a little uneven for a more weathered look
Just make sure to keep the layers really light (too thick and it will pool, drip, or bleed under the letters).  I ended up doing 3 light layers - leaving it a little uneven.

Give the spray paint plenty of time to dry (overnight if possible).  Then comes the arduous task of removing the vinyl letters... this is the worst part of the project!  I used a pair of old tweezers to pull up the letters and it worked wonders!


When all the vinyl letters have been removed, sit back and enjoy your creation!  You can sort of see how the spray paint is a little uneven - I personally like this look, but you can spray on even layers if you want a more polished look.


Mine is hanging over our fireplace and looks absolutely fantastic!  It is always a conversation piece when people come over.


I made one for a friend who just had a birthday and she about DIED when I gave it to her (in a good way, of course!).  I am making another one for a friend who is getting married in a few months.  This project is a little time-consuming, but very well worth it.

Love the idea, but don't want to make it yourself??  Buy a personalized piece at my Etsy shop!

Good luck and happy creating, friends!

  Follow Me on Pinterest

February 6, 2012

Super Bowl 2012

What a fun time to be a Hoosier!  We live in Indianapolis, who hosted the Super Bowl, so my husband and I spend a few days downtown in Super Bowl Village - so much fun!!  Here we are one evening at Monument Circle in front of the Roman Numerals:

We hosted a very last-minute, small get-together for the game on Sunday.  I LOVE hosting parties because I love to try out new recipes.  Here was my latest creation for the game - hamburger cookies!
I saw these in the recent Martha Stewart magazine.  The "buns" are peanut butter cookies and the "burger" is a brownie.  I colored some frosting for the "condiments" and they turned out so cute!  I sprinkled a touch of sesame seeds on top to look more like buns.  And a quick suggestion - keep the brownies really thin... like, barely cover the bottom of the pan.  Otherwise your burgers will be disproportionately larger than your buns.  

I made some beer dip from a recipe from beautyandbedlam.com (here) and it was absolutely amazing!  It was incredibly easy to make and it was really good with the homemade soft pretzels my husband made!

We had a wonderful weekend and it was even better with the Giants win :)  We have tons of leftover food and a slight hang over, but otherwise it was an incredibly successful party!  My husband is happy about the leftovers since I'll be traveling for work all week.  We have a whole pan of homemade wings left, which I'm pretty sure will be his breakfast, lunch, and dinner all week!

And because I love my dog Lucy, here's a picture of her waiting for our Super Bowl guests to arrive.

Apparently no one told her the Steelers lost a few weeks ago!

Have a fabulous week!

February 4, 2012

Decorative Balls


I made the rope bowl a few weeks ago (see it here) and needed something to put in it.  I found this idea on bhg.com and made the fabric wrapped balls.  Unfortunately my laptop fried recently and I wasn't able to recover the pictures I took to create a tutorial.  Laptop is back in business now, but I lost a handful of pictures :(

I ran out of fabric and had one ball left, so I decided to do something a little different with it.  Here's what I ended up with:


 I started with some silver thumbtacks I found at the dollar store (and a Bud Light, hehe)


 I just started at the top and began to work my way down, placing the thumbtacks in a circle around the middle.

I did two "layers" in one direction around the ball, then 2 "layers" in the other direction.  This helps the thumbtacks lay a little better against the ball - plus I think it looks better.  There is a seam in the middle of the ball which was a good reference point to try to keep the circles even.

But it's ok if your circles of tacks aren't perfect, I promise it will look ok!  You can keep going with the circles all the way to the bottom, but I chose to stop here:

You won't see the bottom of it in the bowl anyway, so I chose to save some time and thumbtacks and stop there.  I love the way it turned out and I love the one different ball mixed in with the fabric balls.

                                       
Happy creating, friends!

February 2, 2012

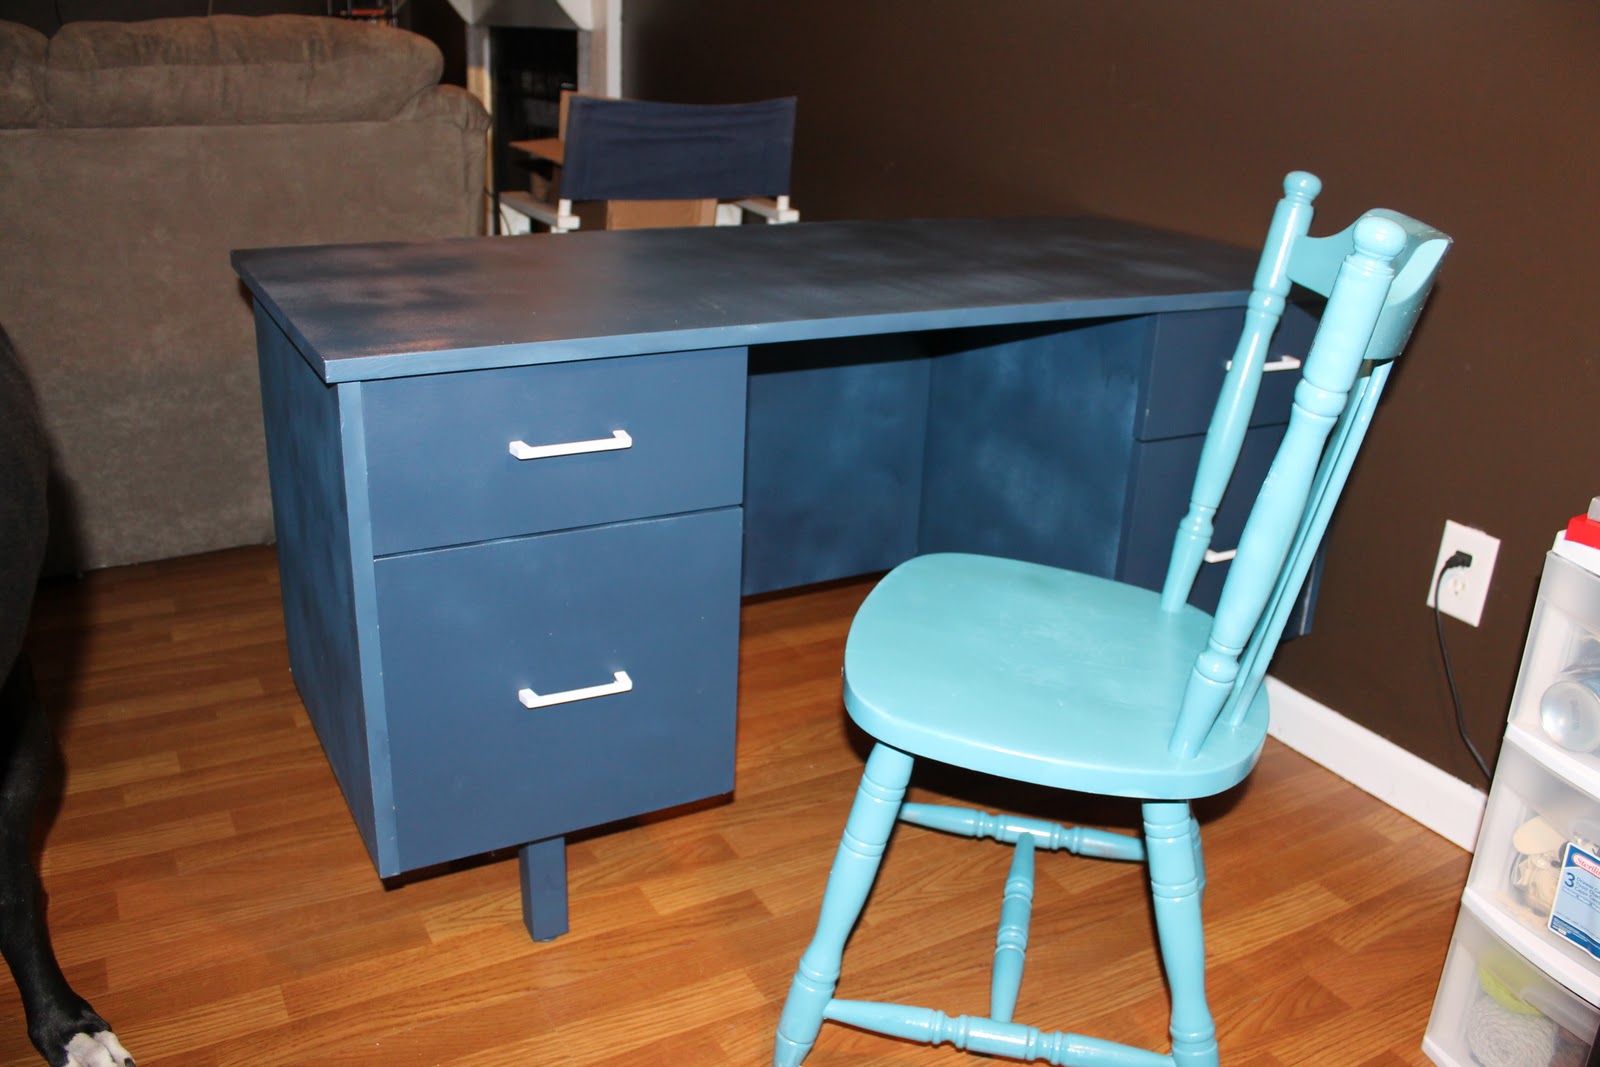
Desk Repurpose

So, as I started all my crafting and creating, I quickly realized I needed a work and storage space.  I had been using our dining room table, which my husband was not too thrilled with come dinner time!  And I was storing my supplies in the spare bedroom, which was a problem when we had guests over Christmas!

So I started the hunt for a desk and chair at our local thrift stores.  I finally found this desk and chair at Goodwill.

Our local Goodwill stores offer 20% off a $20 purchase every Friday (through their Facebook page) PLUS 10% off a $20 purchase every day if you carry one of their "rewards" cards.  Apparently you can use both of those discounts on Fridays, making this desk and chair just under $25!

This was my first time spray painting furniture, and I sure did learn a lot.... mostly what NOT to do!  I used a bonding primer, but brushed it on, leaving brush marks.  I sprayed the colors on a little too thick leaving some drips and I sprayed on layers before the previous layer was dry, making the finish a little splotchy.  I also didn't put any kind of finish on it, so it's already starting to scratch and chip a little bit :(

I'm planning on stenciling a pattern on the top (one of these days....).  But I can say I learned a LOT about painting furniture!  I repurposed a book case that I now use as a china cabinet - which I'll show another day - and it turned out a million times better!  More on that to come :)

February 1, 2012

Sisal Rope Bowl

Follow Me on Pinterest


I fell in love with the rope-wrapped bowl I saw in this tutorial from centsationalgirl.com (check out the site, it's aaahhhh-mazing!).  So of course, I had to try it!

I found this metal container at Goodwill for $1.99.  


The sisal rope came from Lowes and was about $6 - but I have plenty left over for another container!  All you have to do is hot glue the rope around the container, it was SO easy.  Wrap the rope around the handles as well.


The original tutorial suggested wrapping the rope inside the container as well.  I chose to fill the bowl with fabric-wrapped styrofoam balls, so I didn't see a need to do the inside.  See how to make the balls here.

Here is the final product, displayed beautifully on the console table I repurposed (I'll have a tutorial on that another day!).


Happy creating, friends!


Follow Me on Pinterest